Configuring the Exchange Connector
After installing the Exchange Connector, there are three required configuration procedures:
| 1. | publishing FaxPress forms. The FaxPress forms provide seamless fax/email integration, allowing Outlook users to send and receive faxes straight from the Outlook client. |
| 2. | configuring the Outlook Contact Database Fax Address Template . This enables Outlook’s Business Fax entries for Exchange Connector use. Setting the other properties is optional. |
| 3. | using the FaxPress Exchange Connector Properties utility to configure your Exchange Connector settings. The FaxPress Exchange Connector Properties for Exchange 5.5 are slightly different from those for Exchange 2000/2003. |
The Exchange Connector setup automatically installs two FaxPress forms, FaxPress_View for incoming faxes, and FaxPress_Send for outgoing faxes. Together, these forms provide seamless Microsoft Exchange/FaxPress client-side integration.
FaxPress_View - this form allows users "one-click" viewing of inbound fax messages. Once published, the FaxPress_View form must be enabled in the Gateway Configurator before being used.
FaxPress_Send - this form allows users access to a fax form right from the Outlook client, and also allows users to configure outbound fax jobs with a variety of easily customized delivery options.
These forms consist of .oft files, user templates that fax-enable the Outlook mail client. In order to be functional, however, the forms need to be defined on the Exchange server by publishing the .oft files to the Exchange server once, from any Outlook client.
The FaxPress_View form is only available if the Email Gateway’s Exchange Connector using MAPI is selected. The Exchange Connector Using SMTP option provides the FaxPress_Send form only.
Before publishing the FaxPress forms, confirm that your Exchange server has an Organizational Forms Library, and that the Outlook client is installed, configured and operational.
To confirm that a 5.x Exchange server has an Organization Forms Library, run the Exchange Admin program and select Forms Administrator from the Tools menu. If you do not have an Organization Forms Library, add one by clicking New.
To confirm that a 2000 Exchange server has an Organization Forms Library, run the Exchange System Manager. Select Public Folders then click the Action button and select View System Folders from the menu. Select the system folder EFORMS REGISTRY. If an Organization Forms Library is not listed, add one by right-clicking EFORMS REGISTRY, then select New>Organizational Form from the shortcut menu.
To publish the FaxPress forms, follow these steps:
| 1. | Open the Outlook client. |
| 2. | Place the Castelle FaxPress 9.x CD-ROM in the CD-ROM drive. |
| 3. | Browse to the Add On Products folder. |
| 4. | In the ECNAG folder, double-click the associated file name for the FaxPress_View or the FaxPress_Send form. |
|
Form |
File name |
|
FaxPress_View |
FaxPress_View.oft |
| FaxPress_Send | FaxPress_Send.oft |
| 5. | If prompted, click Enable Macros. This opens the form. |
| 6. | Select Forms from the Tools menu, and then click Publish Form As. This opens the Publish Form dialog box. |
| 7. | In the Look In box, select Organization Forms Library. |
| 8. | In the Display Name box, type a descriptive name for the form, such as the names shown in the following table. The name will appear in the Form Name box. Verify the message class for the form, as shown in this table. |
|
Form |
Display Name | Message Class |
|
FaxPress_View |
FaxPress_View | IPM.Note.FaxPress_View |
| FaxPress_Send | FaxPress_Send | IPM.Note.FaxPress_Send |
| 9. | Click Publish. |
Enabling the FaxPress_View Form
Once the FaxPress Forms are published, the FaxPress_View form must be enabled before use by opening the Email Gateway Configurator, selecting the Fax to Email tab, and checking the Use FaxPress_View Form for received faxes option.
Configuring the Connector for Exchange 5.5
The FaxPress Exchange Connector Properties allow you to configure the Exchange Connector for Exchange 5.5.
Follow these steps to access the Exchange Connector Properties:
| 1. | Log onto the Exchange Server with administrative privileges and start the Microsoft Exchange Administrator. |
| 2. | Expand the Configuration branch on the left, then select Connections. Double-click the FaxPress Exchange Connector display name. |
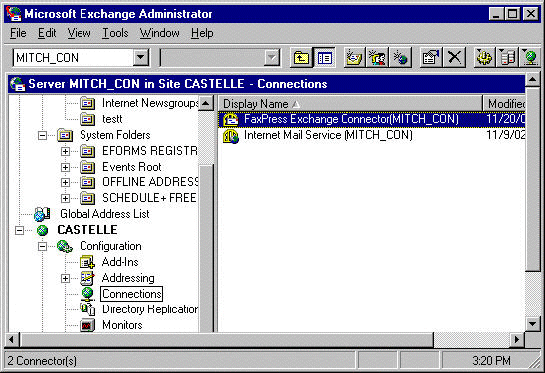
| 3. | When the Exchange Connector Properties screen appears, click the tabs indicated in each of the following sections. |
Options Tab
The Options tab displays the Email Gateway machine name.
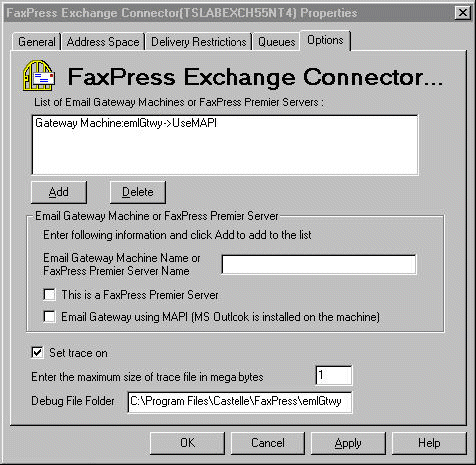
List of Email Gateway Machines or FaxPress Servers – displays the current Gateway machine names added during the Exchange Connector installation. If you use more than one Gateway, be sure to enter the name of the new Gateway to this list. If multiple Gateway machines are listed, load sharing will automatically go into effect, with the Exchange Connector distributing outgoing faxes among the Gateway machines.
FaxPress Exchange Connector Debug Level – use this button to control the amount of information written to the diagnostic trace.txt file. Leave the debug level set to the default 0 unless, for troubleshooting purposes, more information is required. Refer to your FaxPress manual for more information on the trace.txt file.
FaxPress 7.x users: The FaxPress’s Exchange Connector is backward compatible with the 7.x FaxPress Email Gateway. If you’d like to use the Connector with a 7.x Email Gateway, enter the name of an Email Gateway machine in the Email Gateway Machine Name field, click Add and leave the This is a FaxPress Server unchecked. Legacy Email Gateway machines always use MAPI.
This is a FaxPress Server – if you’re using the FaxPress’s Email Gateway, rather than a legacy 7.x Email Gateway, select this option.
Email Gateway using MAPI – If you’ve chosen to configure the Email Gateway service on the FaxPress to use the Exchange Connector Using MAPI option, check Email Gateway is using MAPI.
Set trace on – select this option to have the Exchange Connector generate a race file for troubleshooting purposes.
Maximum trace file size – select the maximum trace file size. Trace files can quickly become very large.
Debug File Folder – displays the name of the trace file folder. May be modified.
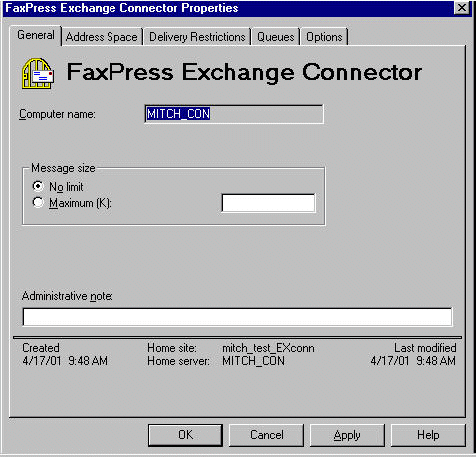
General Tab
The General tab displays the Exchange Connector computer name, allows you to set a maximum message size, and record configuration changes or updates.
Address Space
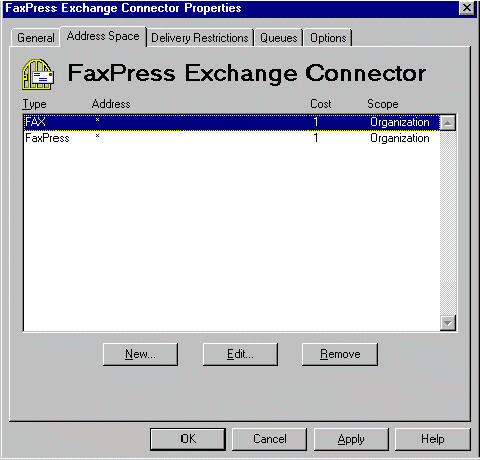
Use the Address Space tab to enable the Exchange Server to send Business Fax entries using the (Undefined variable: FPGatewaysSMTPW.Product name) server.
That is, the Outlook Contact database FAX Address template must be set up before the Contacts list Business Fax entries can be used to send messages via the Exchange Connector.
You must make sure that you have installed the Microsoft Fax Template provided with your Exchange Server software. Refer to your MS Exchange Server documentation for help adding the MS Fax Template.
To create an address space for Outlook, follow these steps:
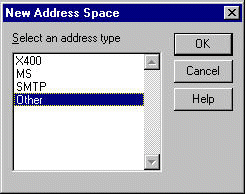
| 1. | In the Address Space tab, click the New button. |
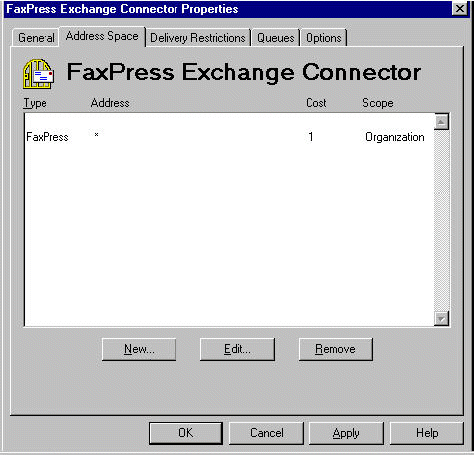
| 2. | In the New Address Space window, select Other, then OK. |
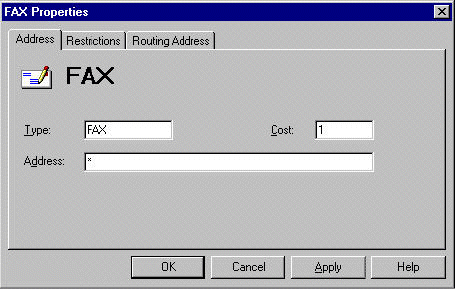
| 3. | In the FAX Properties window, with the Address tab selected, enter FAX in the Type field, and an * in the Address field. |
| 4. | Click OK. The Address Space tab reflects the new entry. |
Delivery Restrictions Tab
Use the Delivery Restrictions tab to allow or deny users the ability to send and receive faxes using the Exchange Connector. If these fields are left blank, no restriction applies.
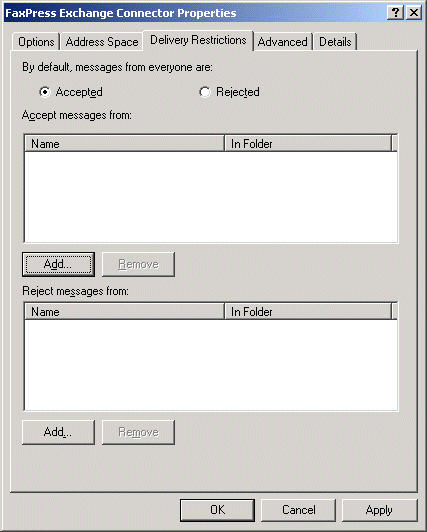
Use the Add buttons to select users you will either accept messages from or reject messages from.
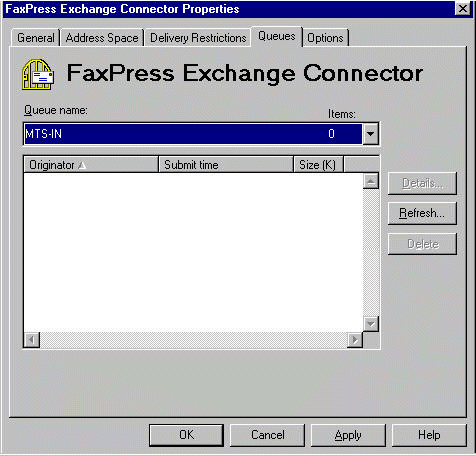
Queues Tab
Use the Queues tab to view the Exchange Connector’s list of outgoing fax jobs.
Configuring the Connector for Exchange 2000/2003
The FaxPress Exchange Connector Properties allow you to configure the Exchange Connector for Exchange 2000/2003. The Gateway Configuration utility can also be accessed from the FaxPress Exchange Connector Properties.
Follow these steps to access the Exchange Connector Properties:
| 1. | Log onto the Exchange Server 2000/2003 with administrative privileges and start the Exchange System Manager. |
| 2. | Expand the Administrative Groups branch on the left, then select Connectors. Right-click on the (Undefined variable: FPGatewaysSMTPW.Product name) Exchange Connector display name, then select Properties. |
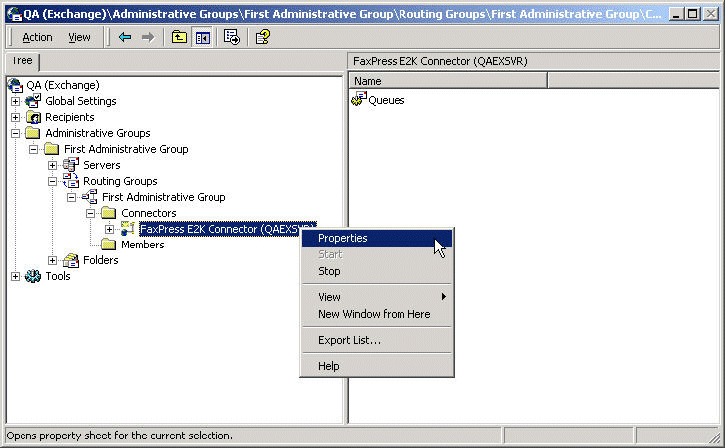
If the Exchange Connector does not initially appear under the Administrative Group Connectors, you may either wait five or ten minutes – the replication time for the Active Directory server – or manually replicate the connections in Active Directory. (See Replicating the NTDS Connections Settings Manually in this chapter)
Options Tab
The Options tab displays the Email Gateway machine names.
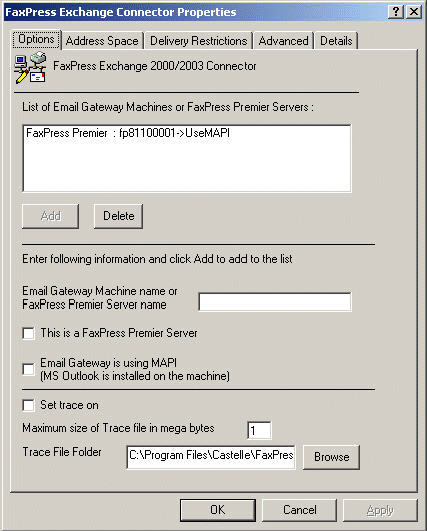
List of Email Gateway Machines or FaxPress Servers – displays the current Gateway machine names added during the Exchange Connector installation. If you use more than one Gateway, be sure to add the name of the new Gateway to this list. If multiple Gateway machines are listed, load sharing will automatically go into effect, with the Exchange Connector distributing outgoing faxes among the Gateway machines.
FaxPress Exchange Connector Debug Level – use this button to control the amount of information written to the diagnostic trace.txt file. Leave the debug level set to the default 0 unless, for troubleshooting purposes, more information is required. Refer to your FaxPress manual for more information on the trace.txt file.
FaxPress 7.x users: The FaxPress’s Exchange Connector is backward compatible with the 7.x FaxPress Native Attachment Gateway. If you’d like to use the Connector with a 7.x NAG, enter the name of a NAG machine in the Email Gateway Machine Name field, click Add and leave the This is a FaxPress Server unchecked. Legacy Native Attachment Gateway machines always use MAPI.
This is a FaxPress Server – if you’re using the FaxPress’s Email Gateway, rather than a legacy 7.x Native Attachment Gateway, select this option.
Email Gateway using MAPI – If you’ve chosen to configure the Email Gateway service on the FaxPress to use the Exchange Connector Using MAPI option, check Email Gateway is using MAPI.
Set trace on – select this option to have the Exchange Connector generate a race file for troubleshooting purposes.
Maximum trace file size – select the maximum trace file size. Trace files can quickly become very large.
Debug File Folder – displays the name of the trace file folder. May be modified.
Address Space
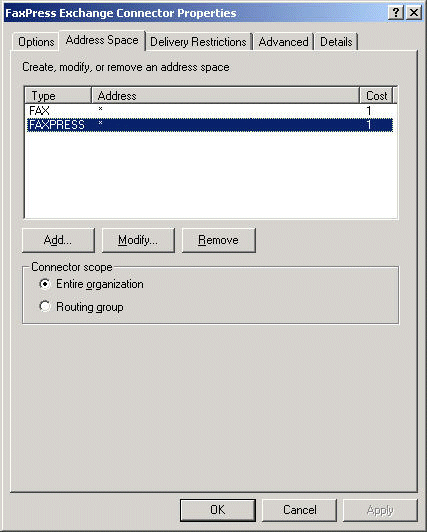
The Address Space tab’s FAX and FAXPRESS entries must be present to enable the Exchange server to send Business Fax entries using the FaxPress server.
Verify both entries exist. If not, reinstall the Exchange Connector.
Delivery Restrictions
Use the Delivery Restrictions tab to allow or deny users the ability to send and receive faxes using the Exchange Connector. If these fields are left blank, no restriction applies.

Use the Add buttons to select users you will either accept messages from or reject messages from.
Advanced Tab
The Advanced tab allows you to set a maximum message size.
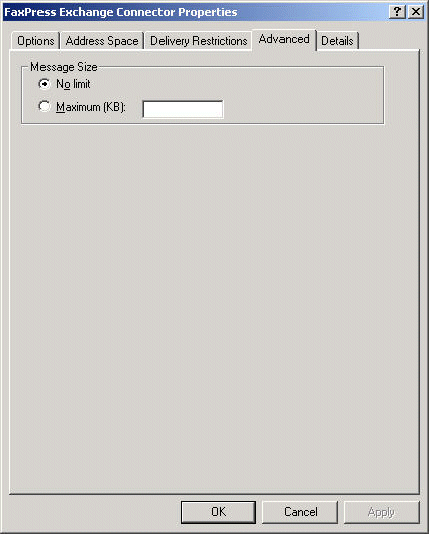
Click the No Limit radio button or enter a maximum message size, measured in kilobytes.
Details Tab
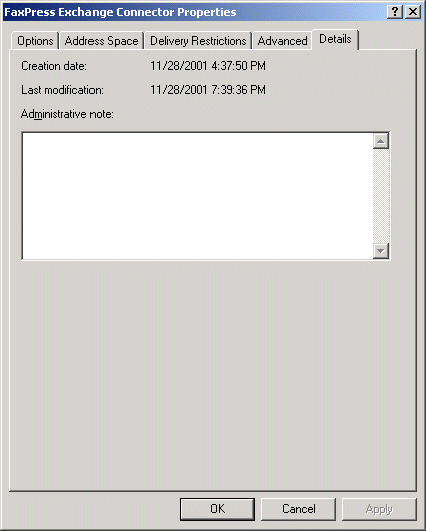
Use the Details tab to record configuration changes or updates, and to annotate them.
Replicating the NTDS Connections Settings Manually
If the Exchange Connector does not initially appear under the Administrative Group Connectors, you may either wait five or ten minutes – the replication time for the Active Directory server – or manually replicate the connections in Active Directory.
Follow these steps to manually replicate the connections:
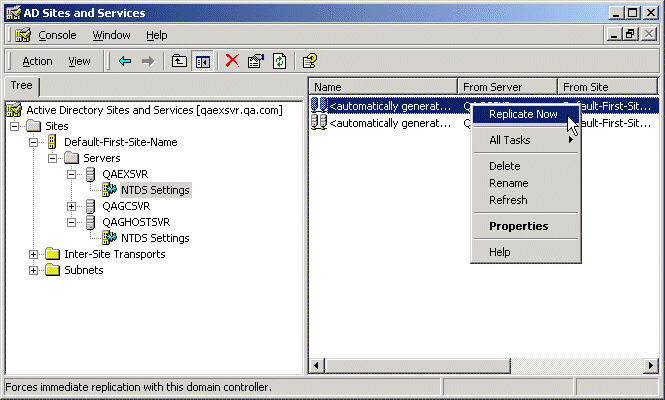
| 1. | Go to Start>Programs>Administrative Tools>Active Directory Sites and Services. |
| 2. | Expand the Sites branch, then the Servers branch. |
| 3. | Select NTDS Settings, then right click on <automatically generate> and select Replicate Now. |
| 4. | Repeat for each connection entry. |
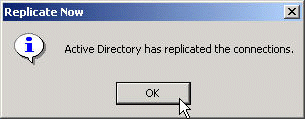
| 5. | In the Replicate Now dialog box, click OK. |
| 6. | The Exchange Connector will now appear in the Exchange System Manager under Connectors. |
|
FaxPress WebHelp
Last Updated: 9/12/2007
E-mail this page |
Castelle 855 Jarvis Drive, Suite 100 Morgan Hill, CA 95037 Toll-free 800.289.7555 Tel 408.852.8000 Fax 408.852.8100 |